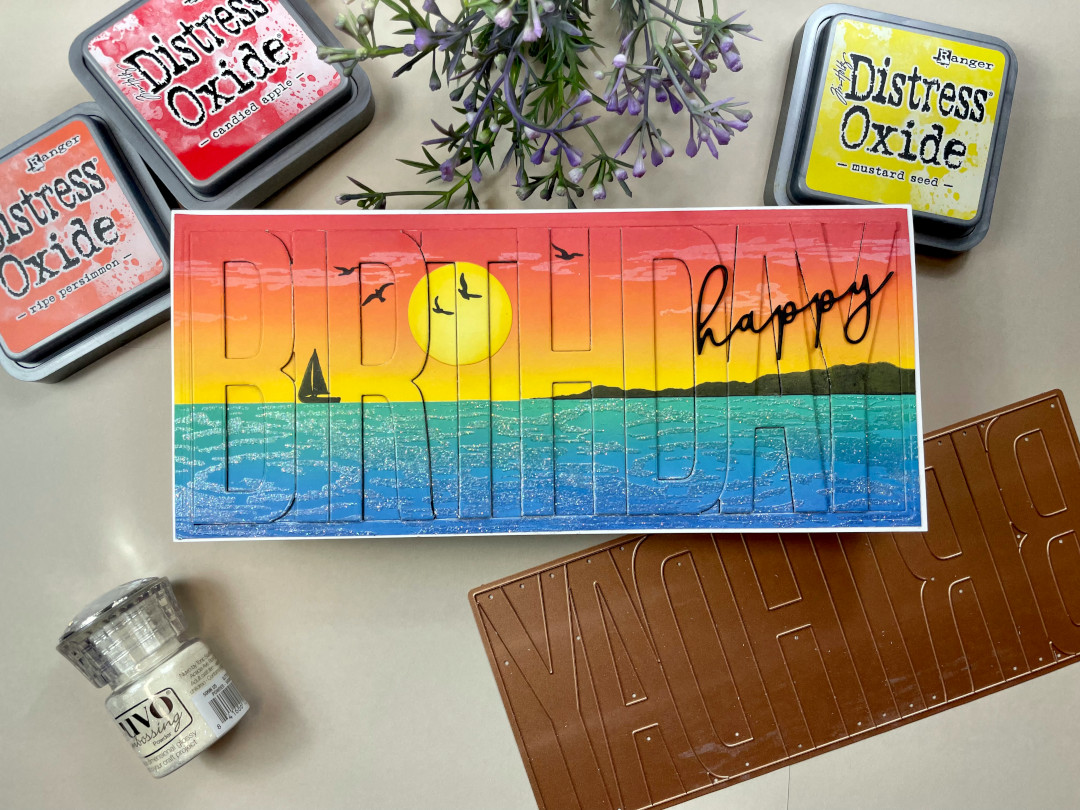
Have you ever heard of or tried the die-cutting eclipse technique? We think this is such a fun technique that creates dramatic results. The new Be Bold Color Block dies by Spellbinders are a collection of large word dies that are great for eclipsing.
Background Panel:
- We chose to use the Birthday word die for our project which measures 3.5” x 8.5”, so we cut a piece of 100 lb. Hammermill cardstock that measured 4” x 9”.
- We decided on an ocean sunset as the backdrop for our eclipse technique, so we taped a horizon on the card panel using 2” Post-It tape to cover the bottom half so we could start on the sky.
- A circle was cut from some masking paper using the circle die measuring 1.25” in diameter. We removed the release paper and placed the circle on the top half of the panel.
- Yellow, orange and red Oxide inks were used to blend a sunset sky above the Post-It tape.
- With Versafine Clair ink, the land and sailboat stamps were used to create silhouettes so they were positioned right on the horizon.
- The Post-It tape was carefully removed and the ink was thoroughly dried with our heat tool (do not skip this step! Oxide and Versafine inks take time to completely dry and you don’t want an accidental smudge)
- Using a new piece of Post-It tape, we taped along the horizon line to cover the sky we just finished creating.
- Blue-green and blue Oxide inks were used to blend an ocean below the horizon.
- The Post-It tape was carefully removed and the ink was once again thoroughly dried with our heat tool.

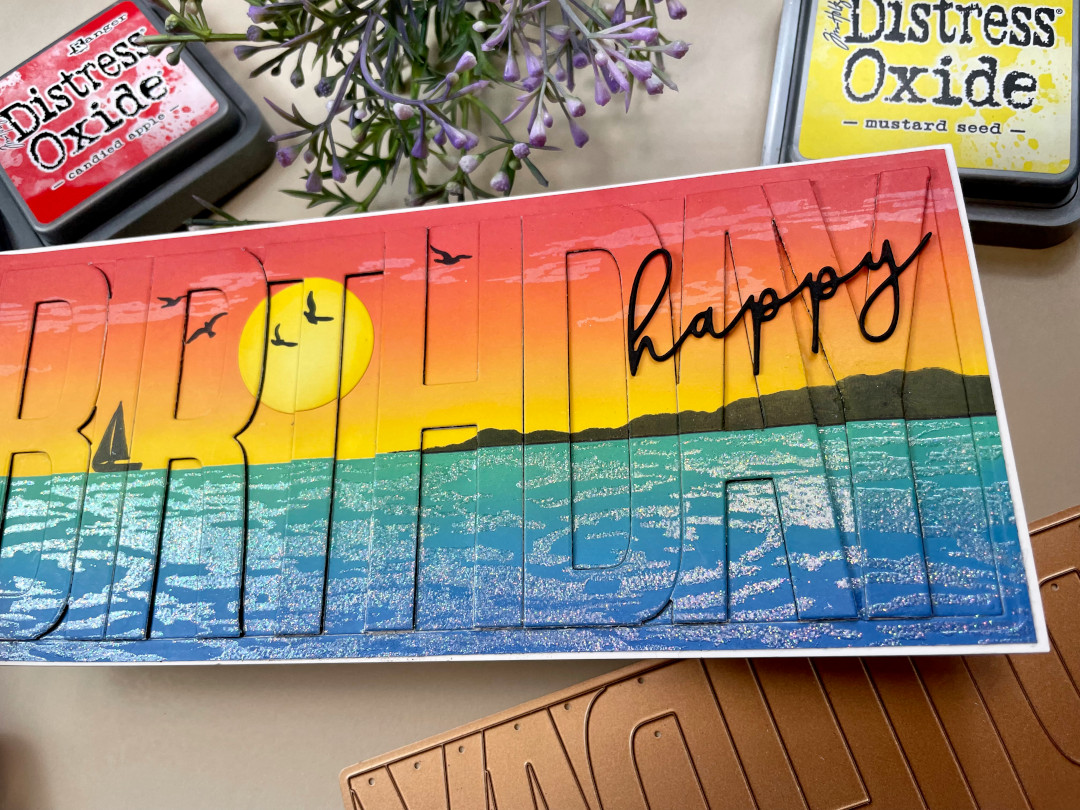
- We thought that the images on The Greetery stamp set could be used to create ripples in the ocean even though they were intended to be clouds. Using VersaMark embossing ink, we stamped “ripples” randomly across the bottom of the card and not worrying if there was overlap of our stamping but being careful not to stamp onto the sky. The ink was covered with a shimmery translucent embossing powder and then heat set.
- The circle mask was carefully removed but did, unfortunately, tear the underlying cardstock slightly. To remedy this, we cut a circle from 100 lb. white cardstock using the same circle die we used to create the mask. Yellow Oxide inks were used to blend color onto the circle and then this was adhered in place covering the “boo-boo” with liquid glue.
- We completed the scene using white pigment ink to stamp clouds in the sky with the same stamps that we used to create ripples in the water. Finally, birds were stamped in the sky with Versafine Clair ink. A heat tool was used to thoroughly dry this ink before proceeding to the next step.
Eclipsing:
- The finished background panel was trimmed down to measure 3-7/8” x 8-7/8”.
- Double-sided tape was adhered to the entire back side of the background panel. The purpose of using double-sided tape was to have the die cut pieces stay intact after running through the die-cutting machine.
- The Birthday die was cut 3 times using black cardstock. The letters were stacked and glued together with liquid glue.
- Now for the scary part (we admit having anxiety when it was time to align the die to our beautiful background knowing we were about to cut it all up). We were very careful to align the die so that it was centered on the panel. Using low-tack tape, we taped the die to our panel to keep it in place and ran it through our die-cutting machine.
- Each letter was slowly pulled away from the die cut word and adhered to the corresponding black letter stack giving thickness to the letters.

Card Assembly:
- A white 120 lb. card base was created that measured 4” x 9”.
- The small thin outer frame from the “negative” die-cut pieces was pulled away from the release paper and carefully adhered to the card base as straight and centered as possible.
- The letters were glued inside the outer frame with liquid glue and the remaining “negative” die-cut pieces were removed from the release paper and positioned in place onto the card base.
- The word “happy” was die cut 3 times from black cardstock, stacked and glued together with liquid glue. This was adhered onto the front of the eclipsed card front with liquid glue.
We hope this made sense and that you will give it a try. If you do, we would love to hear about your results. Thanks for stopping by.
Crafty hugs!
Maureen and Michele
“Kindness is a vast color that only your heart knows how to paint”
-RAKtivist
Supply List:
- Birthday Die: Spellbinders – Be Bold Color Block Birthday
- Hello Die: Scrapbook.com & Pinkfresh Studio – Thin Words Everyday Script
- Circle Die: Waffle Flower – Nesting Circles
- Water, Clouds, Landscape Stamps: The Greetery – Sunset Skies
- Sailboat & Birds Stamps: Hero Arts – Color Layering Sea & Sky
- Circle Die: Waffle Flower – Nesting Circles
- Embossing Powder: Nuvo – Shimmering Pearl
- Embossing Ink: Tsukineko – VersaMark
- Black Ink: Tsukineko – Versafine Clair
- 75” Roll of Double-Sided Adhesive: Couture Creations
- Liquid Glue: Bearly Art – Precision Craft Glue
- Oxide Ink: Ranger – Mustard Seed, Wild Honey, Ripe Persimmon, Candied Apple (Sky); Squeezed Lemonade, Mustard Seed (Sun); Peacock Feathers, Mermaid Lagoon, Prize Ribbon (ocean)
- Cardstock:
- White 100 lb – Hammermill Premium Color Copy Cover
- White 120 lb (card base) – Accent Opaque


1 Comment
Aileen Ryan
January 31, 2022 at 9:59 pmI love this so much, if I and able to get this birthday die I am going to try making this card, I love all the steps you have provided, thank you. It is a masterpiece