
Welcome! Have you experimented with alcohol inks to make fun colorful backgrounds? If so, how often do you actually put them to use in your cardmaking? Admittedly, we haven’t mastered that step yet, but we are trying! Today’s card is the result of using one of those backgrounds and we think it worked perfectly.
Focal Point:
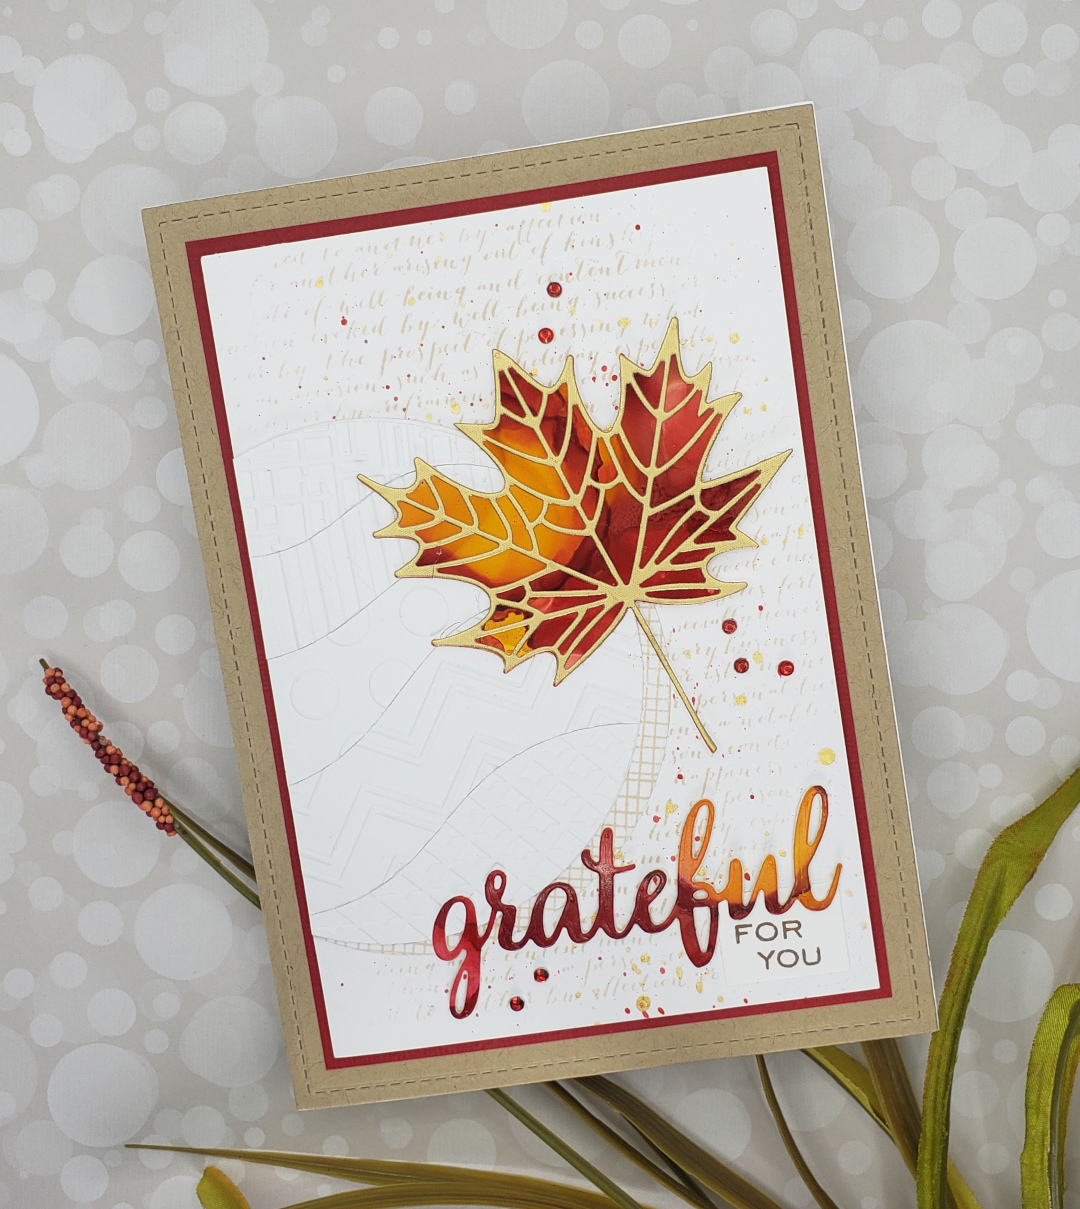
- Using the solid maple leaf die, cut one leaf from a Yupo paper background colored with alcohol inks
- Using the detailed maple leaf die, cut one leaf from matte gold cardstock
- The leaf layers were adhered together with liquid glue
- The Circle of Waves die was cut once from 80 lb white cardstock
- Each separate “wave” slice was dry embossed using a different embossing folder resulting in 5 wave slices, each with a different dimensional pattern
- The waves were then reformed into the original circle configuration and adhered to a circle of lightweight white cardstock with liquid glue
- Another die cut circle (the same size as the Circle of Waves die cut) was stamped with a background stamp resembling mesh using a very light tan dye ink

Background Panel:
- A 4 ¼” x 6 ¼” white cardstock panel was loosely stamped with a scripty background stamp using a very light tan dye ink
- The background panel was then splattered with metallic gold ink spray and red acrylic paint thinned with water
- The grateful word was cut once from the same alcohol inked Yupo paper as the maple leaf and 2 more times from scrap white cardstock. The layers were then adhered together using liquid glue, with the colorful layer on the top
- The sub sentiment was stamped using a light brown dye ink and was cut into a sentiment strip
Card Assembly:
- The white dry embossed circle was adhered to the top of the mesh stamped circle slightly offset so the stamped circle appears to be the shadow of the embossed circle element
- The layered circle elements were then adhered directly to the card panel (hanging slightly off the left edge) using liquid glue. Once dry, the excess was trimmed off flush with the edge of the card panel
- The maple leaf element was adhered to the card front. A bit of low-profile foam tape was used to support the right edge of the leaf that is hanging off the circle element
- The sentiment and sub sentiment were adhered to the card panel
Finishing Touches:
- The white card panel was adhered to a very thin red mat and then a wider mat cut from kraft cardstock measuring 5” x 7” using liquid glue
- The entire matted card panel was adhered to a 5” x 7” white card base cut from 120 lb white cardstock
- Small red jewels were adhered to the card front using liquid glue
Thank you for visiting us today. Stay safe and happy crafting!
Michele and Maureen
“Kindness is a vast color that only your heart knows how to paint.”
RAKtivist
Supply List:
- Layered leaf: Honey Bee Stamps – Lovely Layers Maple Leaf
- Sentiment: My Favorite Things – Grateful Die-Namics
- Sub sentiment: Sunny Studio – Elegant Leaves
- Circle element: Reverse Confetti – Circle of Waves
- Shadow circle stamp: Papertrey Ink – Loosely Woven
- Script background stamp: Hero Arts – Script Bold Prints
- Stitched mat (Kraft): Waffle Flower – Lacy Layers 5×7
- Jewels: Hampton Art


No Comments