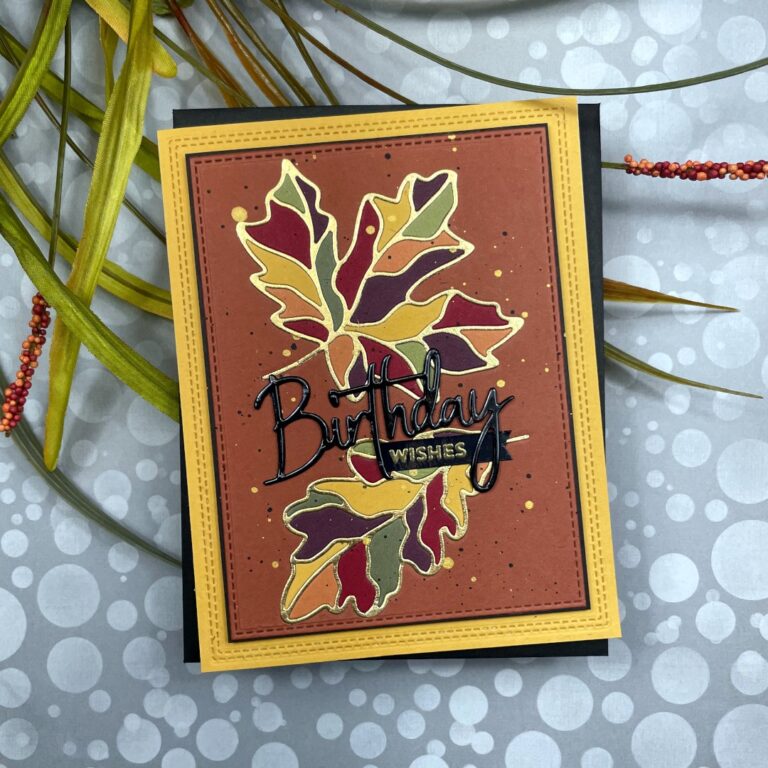
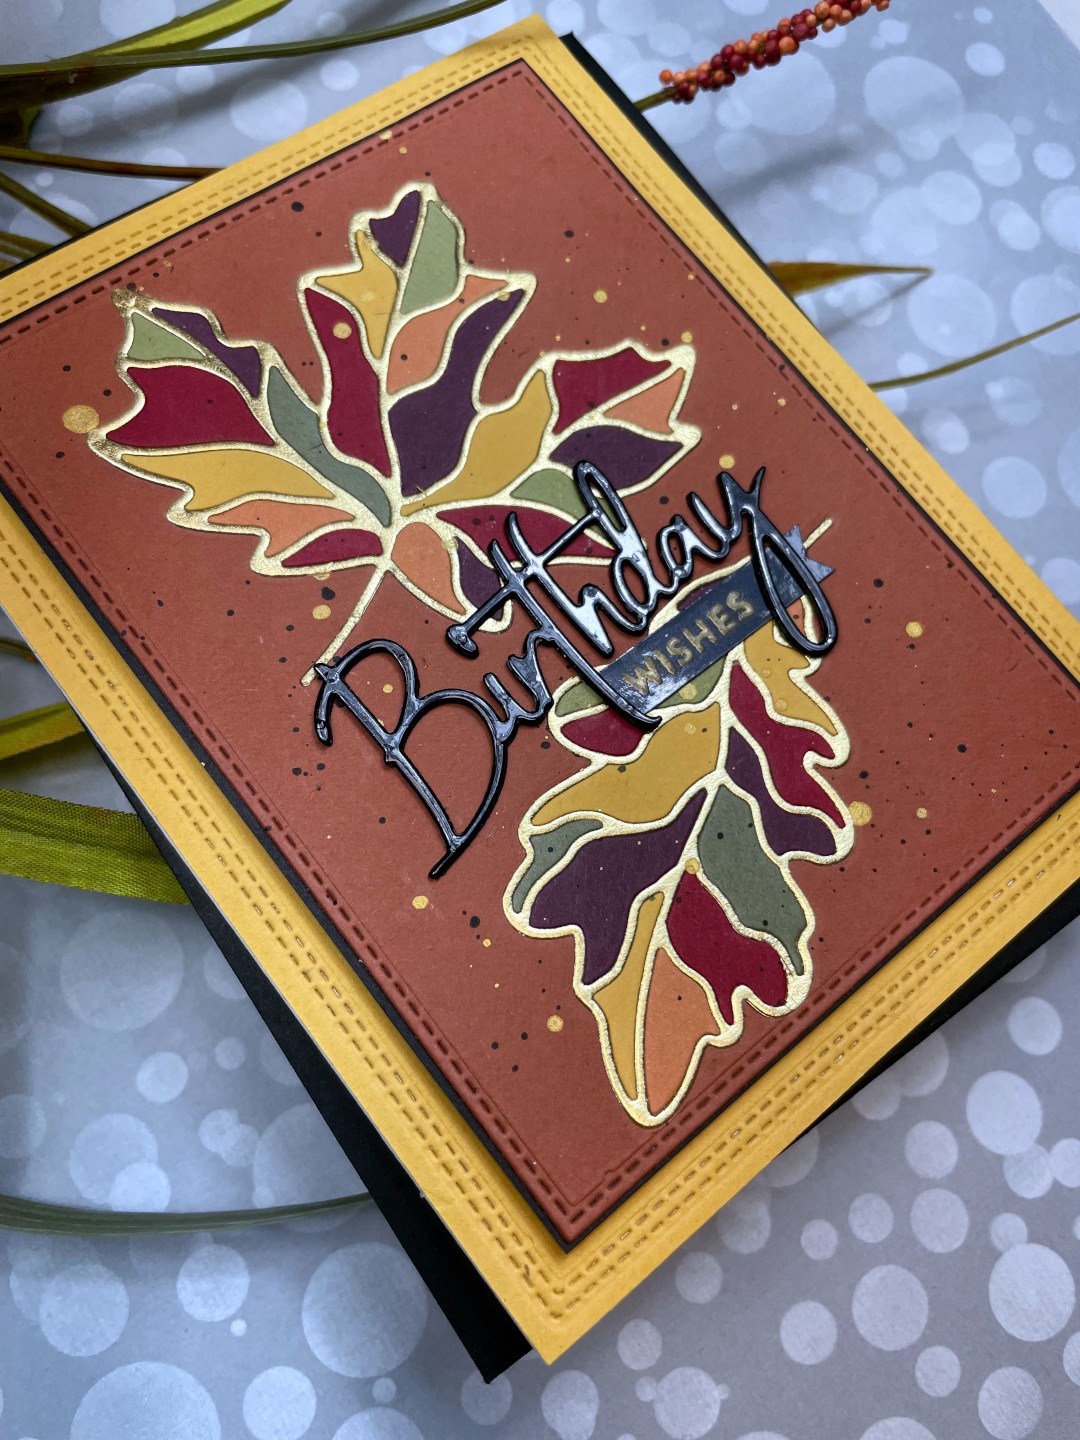
Hello Friends! Have you ever tried the diecut inlay technique? It’s really just a fancy name for paper piecing, but we find it relaxing and enjoyable – somewhat like putting a jigsaw puzzle together. It’s definitely a great way to use up small scraps of cardstock. We have an autumn-themed birthday card to share with you today using this technique.
Focal Point:
- We selected a rust-colored cardstock to use as the main card panel and cut it to 4-1/4″ x 5-1/2″. The leaf dies were laid out on the panel and run through our diecutting machine.
- A piece of double-sided adhesive was cut just large enough to cover the negative leaf openings left in the card panel. The release paper on one side of the adhesive sheet was removed and adhered to the back of the card panel so that the sticky adhesive was exposed on the front of the card panel through the leaf openings.
- The leaf dies were cut from metallic gold cardstock and the inside pieces of the leaves were removed leaving just the outline (vein) portion of these diecuts which were carefully adhered to the sticky negative openings on the card panel.
- The leaves were diecut several times from different fall-themed colors of cardstock scraps. This time, only the inside pieces of each leaf diecut was saved. Then the pieces were randomly selected from the different colors and adhered to the exposed adhesive inside the gold outlines.

Background Panel:
- The panel was cut down using the second largest stitched rectangle die.
- Black and gold metallic splatters were added to the panel and set aside to dry.
- The sentiment was cut once from glossy black cardstock and twice from black cardstock. These layers were stacked and adhered together using liquid glue to create dimension and stability to the word diecut.
- The word ‘Wishes’ was heat embossed with gold powder onto a scrap of the glossy black cardstock. (Note: we used the lower setting on our heat gun and kept the heat moving so as not to cause the glossy layer of the cardstock to bubble.)
Card Assembly:
- The panel was mounted to black cardstock to create a 1/8″ border around the panel.
- A mustard yellow colored cardstock was cut to 4-1/4″ x 5-1/2″ and a double-stitched rectangle die was used to add detail to the outside edge of the piece.
- The card panel was adhered to the stitched yellow cardstock with foam adhesive.
- The sentiment and subsentiment were adhered to the center of the card panel with liquid adhesive.
- The completed panel was adhered to a side-folding 120# white A2-sized card base.
Thank you for visiting us today. Stay safe and happy crafting!
Maureen and Michele
“I’ve learned that people will forget what you said, people will forget what you did, but people will never forget how you made them feel.”
Maya Angelou
Supply List:
- Leaf Dies: Simon Says Stamp – Ornate Leaves
- Birthday Die: Spellbinders – Simply Perfect Mix & Match Sentiments
- Wishes Stamp: My Favorite Things – Bitty Birthday Wishes
- Stitched Die: My Favorite Things – Stitched A2 STAX
- Double Stitched Die: Lawn Fawn – Just Stitching Double Rectangles
- Liquid adhesive: Bearly Art Precision Craft Glue
- Double-sided adhesive: Scrapbook.com – 6″ x 8.5″ clear double-sided sheets
- Colored Cardstock: Misc. muted scraps from stash
- Black Glossy Cardstock (sentiment): Tonic Studios – Mirror Card – Glossy Black
- Gold Cardstock: American Crafts – 6×6″ Gold Foil Paper Pad
- Embossing Powder: Nuvo – Classic Gold
- Embossing Ink: Tsukineko – VersaMark
- White cardstock: Accent Opaque 120 lb.


No Comments