Welcome friends! What is your favorite season? For us, it is definitely Summer and we think our card today captures it’s essence perfectly. We used the Small Butterflies product bundle (stamps, stencils, dies and hot foil plates) for the first time and we love all the options it provides!
Floral Wreath:
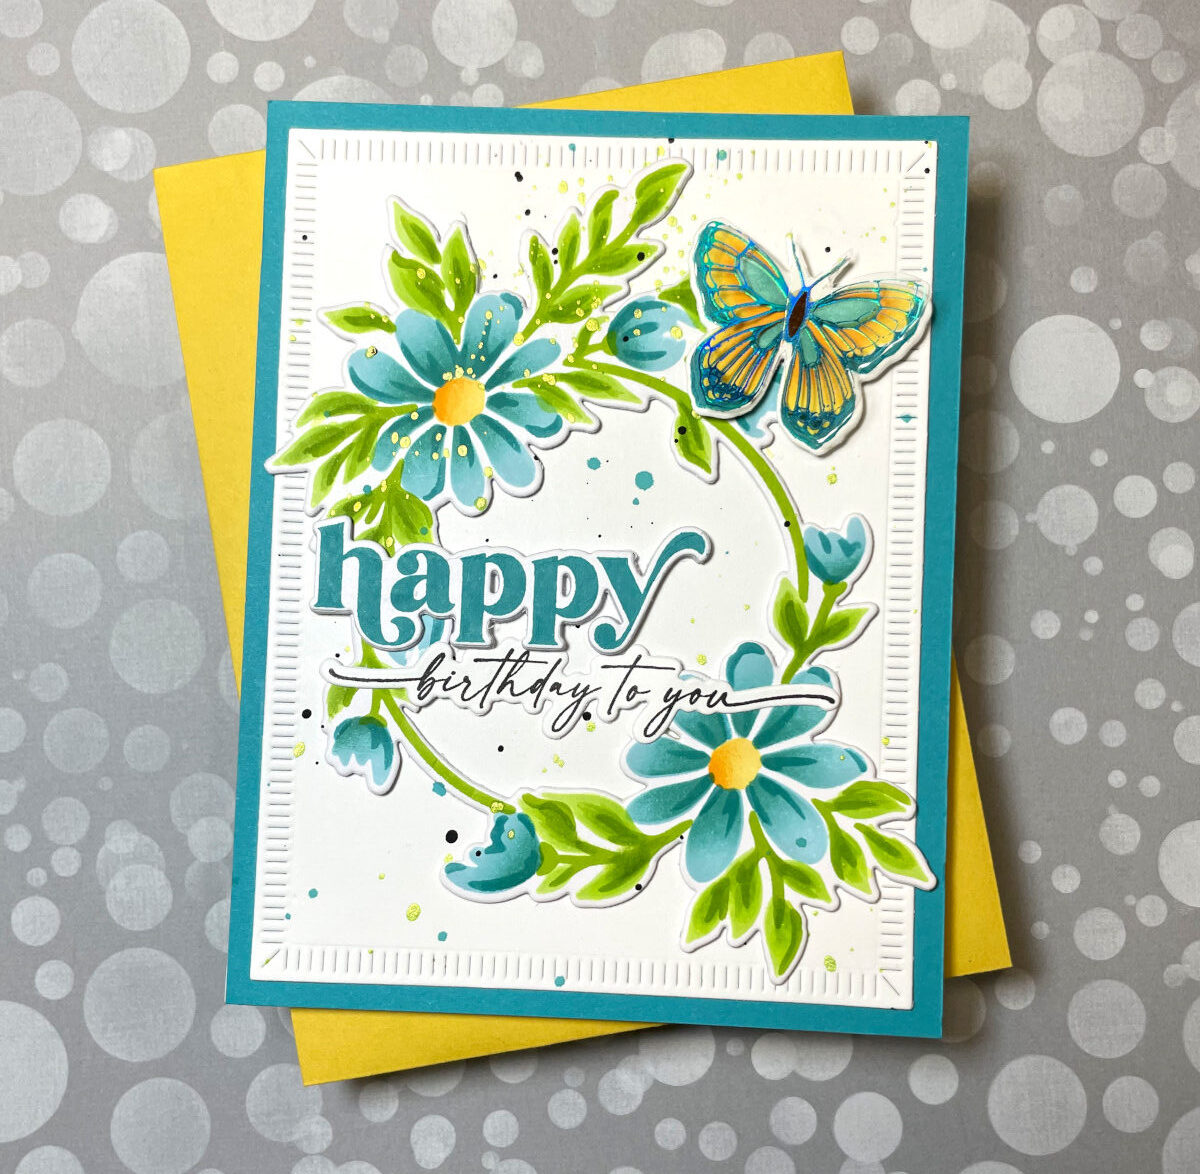
- We started by using all stencil layers to create the wreath using a pair of blue inks for the petals, yellows for the flower centers and greens for the leaves.
- Using complimentary Copic markers, we enhanced some areas of the flowers and leaves to deepen shadows and soften the blended areas.
- The wreath was cut out using the coordinating die. Using the same die, we cut out the wreath from plain white cardstock twice and glued these layers together with liquid glue. The colored wreath was then glued to the top of this giving the wreath added dimension and strength.

Butterfly:
- Using our Spellbinders Glimmer Hot Foil system, we foiled the butterflies twice using gold foil. The first time we foiled onto Simon Says Stamp 120# white cardstock (this cardstock gives some of the best hot foiled results). The second time we foiled onto heat resistant acetate.
- Using the coordinating stencils, we ink-blended the paper foiled butterflies using the same blue and yellow dye inks that we used to color the flowers.
- The paper foiled butterflies were cut out using the coordinating die.
- We discovered that the die would not cut through the acetate no matter how many shims we used, so we ended up fussy cutting the specific butterfly we wanted to use on our card.
- The acetate foiled butterfly wings were slightly bent where the butterfly wings meet the body. Liquid glue was added to the butterfly body of the paper foiled version and the acetate butterfly was adhered on top and set aside to dry.

Sentiments:
- The word ‘happy’ was stamped onto 80# Accent white cardstock using the same blue dye ink used for the flower petals and then cut using the coordinating die.
- The word was cut two more times from white cardstock, glued together and then adhered to the back of the stamped word to create dimension.
- Using Versafine Onyx Black ink, the sub-sentiment was stamped onto 80# Accent white cardstock and cut using the coordinating die.

Background Panel:
- The large crimped rectangle die was used to cut a card panel from 80# white Accent cardstock.
- The white card panel was adhered to a Teal colored piece of cardstock measuring 4.25″ x 5.5″.
Card Assembly:
- The wreath was glued to the center of the white card panel.
- Black, gold and blue splatters were added to the card panel and wreath using some watered-down acrylic paint.
- The butterfly and sentiments were adhered using liquid glue.
- The card panel was adhered to a white, side-folding A2 card base made from Accent 120# cardstock.
Thanks so much for stopping by. Stay safe and happy crafting!
Maureen and Michele
“When we seek to discover the best in others, we somehow bring out the best in ourselves.”
William Arthur Ward
Supply List:
- Flower Wreath: Pinkfresh Studio – Daisy Wreath Stencil set
- Butterflies: Pinkfresh Studio – Small Butterflies
- Sentiment: The Greetery – Opposites Attract
- Crimped Rectangle Die: The Greetery – Crimped Rectangle
- Hot Foil: Spellbinders – Glimmer System – Gold
- Ink: Catherine Pooler Dye ink, Versafine Onyx Black Pigment ink, Copic markers
- Paper: Accent Opaque White 80# and 120# cardstock
- Paper for Foiling: Simon Says Stamp White 120#
- Acetate: Paper Wishes – Heat Resistant Acetate


No Comments